Are you looking to create a new Gmail account but don’t know where to start? Well, you’ve come to the right place! This easy step-by-step guide walks you through setting up your new Gmail account. Whether you’re a beginner or a tech-savvy pro, we’ve got you covered. So, let’s get started and create that new Gmail account!
Table of Contents
What are the benefits of a Gmail Account?
How to start and set up a new Gmail Account?
How to log in and open the new Gmail Account?
How to log out of a Gmail Account?
How to make your Gmail Account more personal?
How to use different email addresses in one Gmail Account?
How to add a signature to your Gmail Account?
How to delete your Gmail Account?
What are the benefits of a Gmail Account?
Are you curious about the benefits of having a Gmail account? Well, let me tell you, there are plenty of reasons why Gmail is the go-to email service for millions of users worldwide.
User-friendly
First and foremost, Gmail is incredibly user-friendly. Its clean and simple interface makes it easy to navigate, even for those who aren’t particularly tech-savvy. Plus, Gmail is accessible from any device with an internet connection, so you can easily check and manage your email.
Great Spam filter
Another great benefit of Gmail is its powerful spam filtering capabilities. With Gmail, you’ll rarely worry about spam emails cluttering your inbox. Gmail’s filters are so effective that they can automatically categorize and route incoming messages, helping you stay organized and focused.
Amazing additional features
And speaking of organization, Gmail has some great features that can help you tidy your inbox. You can create custom labels to sort your messages and even set up filters to automatically apply labels or move messages to specific folders. Plus, Gmail’s powerful search function makes finding specific emails in your archive easy, even if they’re years old.
Easy Access to Google Services
But that’s not all! With a Gmail account, you can access other Google services, like Google Drive, Google Docs, and Google Calendar. You can easily share and collaborate on files, schedule appointments and events, and more from your Gmail account.
Overall, the benefits of having a Gmail account are numerous. From its user-friendly interface to its powerful features and integration with other Google services, Gmail is a fantastic choice for anyone needing a reliable and efficient email service.
How to start and set up a new Gmail Account?
Here is a summary of the easy step-by-step guide on how to create a new Gmail account :
1. Go to the Gmail website and click “Create an account.”

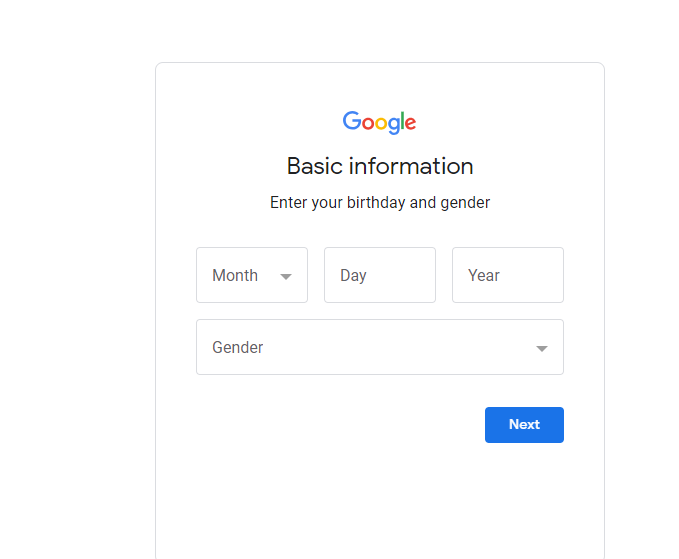
2. Enter your basic information.
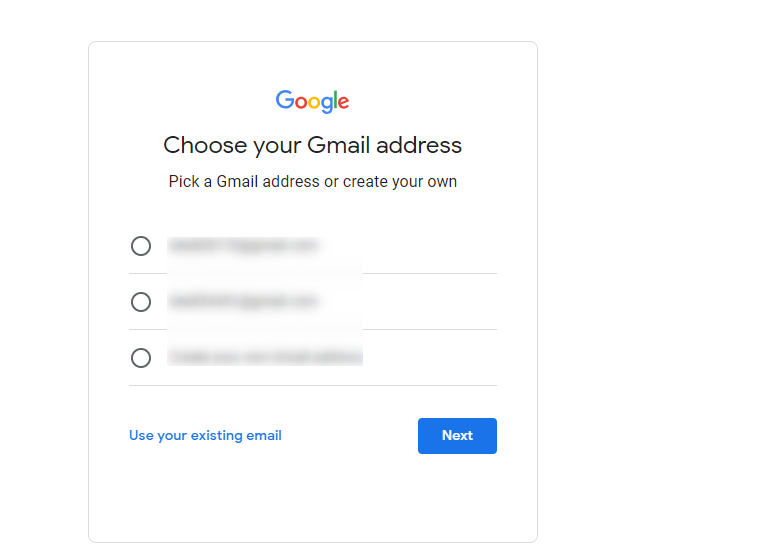
3. Choose a unique username for your new Gmail address.
4. Create a strong and secure password.
5. Add additional information to your profile, like a profile picture or phone number (optional)
6. Set up basic account settings, like language preferences and display options.
And now, we go for a more detailed breakdown of each step to start and set up a new Gmail account:
- Go to the Gmail website and click “Create an account.”First, head to the Gmail website by typing “gmail.com” into your web browser. Once you’re on the website, look for the “Create account” button and click it to start setting up your new Gmail account.
- Enter your basic information. On the account creation page, you’ll be asked to enter basic information like your name, birthdate, and gender. This helps Gmail personalize your email experience and ensure you get the most out of the service.
- Choose a unique username for your new Gmail address. This step is where you’ll choose your new Gmail email address. Think of something unique, easy to remember, and reflects your personality or brand. Don’t worry if the name you want is already taken – Gmail will suggest similar alternatives if necessary.
- Create a strong and secure password. When it comes to passwords, it’s important to choose something that’s both strong and secure. Use a combination of letters, numbers, and symbols, and make sure your password is at least eight characters long. This will help keep your account safe and protect you from hackers or other security threats.
- Add additional information to your profile, like a profile picture or phone number (optional). This step is optional, but adding more information to your profile can help you to personalize your email experience even further. You can add a profile picture to help people recognize you or a phone number if you need to recover your account.
- Set up basic account settings, like language preferences and display options. Finally, you can customize your new Gmail account by setting up basic account preferences. For example, you can choose your language preferences or set your display options to show more or less information in your inbox.
And that’s it – you’ve set up your new Gmail account and are ready to start using all the amazing features that Gmail offers!
How to log in and open the new Gmail Account?
Now you have created your Gmail Account. The next step is to login into your account and start using it. So here’s a step-by-step guide on how to log in and open your new Gmail account:
1. Open your web browser: Start by opening your web browsers, such as Google Chrome, Mozilla Firefox, or Safari.
2. Navigate to the Gmail website: In your web browser, type “gmail.com” into the address bar and press enter. This will take you to the Gmail website.
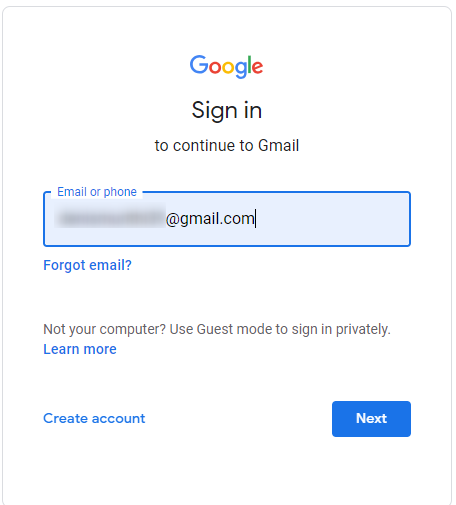
3. Enter your Gmail email address: You’ll be asked to enter your email address on the Gmail login page. Type in the full email address you chose when creating your new Gmail account, and then click the “Next” button.
4. Enter your password: You’ll be prompted to enter the password you created when setting up your Gmail account. Make sure to enter it accurately, as passwords are case-sensitive.
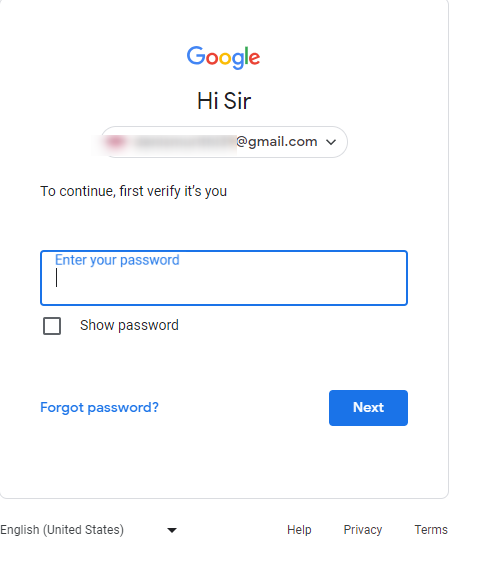
5. Click “Sign in”: Once you’ve entered your email address and password, click the “Sign in” button to log in to your new Gmail account.
Start using your new Gmail account: Congratulations! You’ve successfully logged in and opened your new Gmail account. From here, you can start using Gmail to send and receive emails, organize your inbox with labels and filters, and take advantage of all Gmail’s other great features.
How to log out of a Gmail Account?
By following these simple steps, you can log out of your Gmail account and keep your account secure. Remember to always log out of your accounts when using a shared or public device, and keep your password safe to prevent unauthorized access to your account. Here’s a step-by-step guide on how to log out of your Gmail account:
1. Go to gmail.com
Go to gmail.com to enter your account.
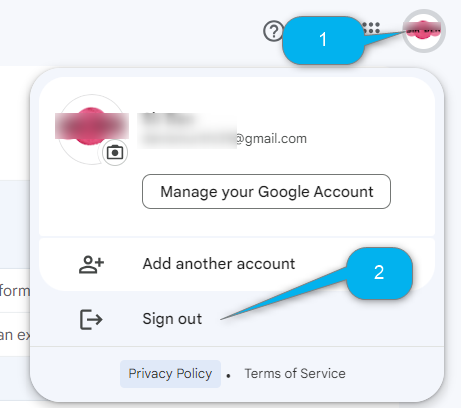
2. Click on your profile picture.
Once you’re logged in to your Gmail account, you’ll see your profile picture in the top right-hand corner of the screen. Click on your profile picture to open a drop-down menu.
3. Click “Sign out”
You’ll see the “Sign out” option in the drop-down menu. Click on this option to log out of your Gmail account.
4. Confirm that you want to sign out.
After clicking “Sign out,” Gmail will ask you to confirm that you want to log out of your account. Click “Sign out” again to confirm.
How can you change your Username?
How change your Username in your Gmail Account is quite easy.
1. Go to your Gmail settings: First, log in to your Gmail account and click on the gear icon in the top right corner of the screen. From there, select “Settings.”
2. Click on the “Accounts and Import” tab: In the settings menu, click on the “Accounts and Import” tab.
3. Click “Edit info”: Under the “Change account settings” section, you’ll see an option to “Edit info.” Click on this option to edit your Username.

4. Change your Username: In the “Edit info” window, you can change your Username. Remember that your new Username must be unique and not already used by another Gmail user.

5. Save your changes: After changing your Username, click “Save Changes” to confirm your new Username.
How to make your Gmail Account more personal?
Are you looking to spice up your Gmail account and make it more personalized and functional? Look no further! In this article, we’ll explore tips and tricks to help you pimp your Gmail account and take it to the next level.
- Customize your theme
Did you know that you can customize the look of your Gmail account with different themes? Simply go to your Gmail settings, click on the “Themes” tab, and choose a new theme from the selection. You can even upload your custom images to use as your Gmail background. - Add a signature
Adding a signature to your outgoing emails can help make them more professional and informative. We will have a look at this topic later in this article. - Use keyboard shortcuts
Did you know that Gmail has a range of keyboard shortcuts that can help you navigate and manage your emails more efficiently? For example, you can press “C” to compose a new email, “E” to archive a message, and “R” to reply to an email. To view all the available keyboard shortcuts, press the “?” key when in your Gmail account. - Organize your inbox with labels and filters.
If your inbox feels cluttered and overwhelming, try using labels and filters to help you organize your emails more effectively. You can create custom labels for different types of emails, like “Work,” “Personal,” or “Promotions.” You can also set up filters to automatically route incoming messages to specific labels, making finding and managing your emails easier. - Integrate with other tools.
Finally, you can pimp your Gmail account by integrating it with other tools and apps. For example, you can connect your Gmail account with Google Drive to easily attach and share files or use third-party plugins to enhance your email experience. Just do your research and only use trusted plugins and integrations to keep your account secure.
How to use different email addresses in one Gmail Account?
Did you know that you can use different email addresses within your Gmail account, making it easy to manage multiple email accounts from one place? Here’s how to do it:
1. Go to your Gmail settings: Go to your Gmail Account, and in the top right corner of your account, click on the gear icon, then select “Settings” from the drop-down menu.
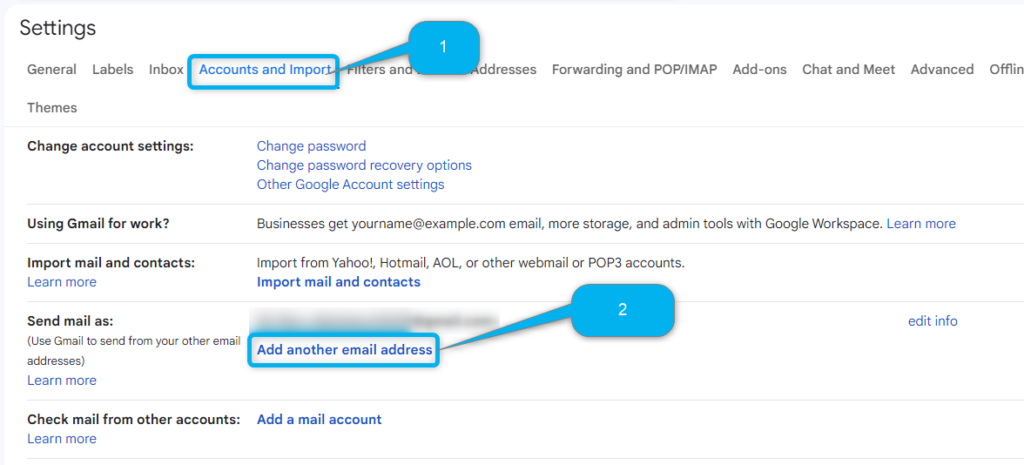
2. Click on the “Accounts and Import” tab: In the settings menu, click the “Accounts and Import” tab to access your Gmail account settings.
3. Click on “Add another email address”: In the “Accounts and Import” tab, you’ll see an option to “Add another email address” under the “Send mail as” section. Click on this option to add a new email address to your Gmail account.
4. Enter the new email address: In the “Add another email address” window, enter the email address you want to add to your Gmail account. You can also choose whether to treat this as an alias (meaning you’ll send and receive email from this address within your primary Gmail account) or as a separate account (meaning you’ll be able to switch between multiple email accounts within your Gmail account).
5. Verify ownership of the email address: To confirm that you own the email address you’re adding, Gmail will send a verification email to that address. Follow the instructions in the email to verify your ownership of the address.
6. Start using the new email address: Once you’ve verified your ownership of the email address, you can start using it within your Gmail account. Select an email from this address from the “From” field when composing a new email.
How to add a signature to your Gmail Account?
Are you looking to add a signature to your Gmail account and make your emails more professional and informative? Great idea! In this article, I’ll walk you through the steps to add a signature to your Gmail account, so you can start making a great impression with every email you send.
1. Open your Gmail account.
First, log in to your Gmail account in your web browser.
2. Go to your settings
Click the gear icon in the top right corner of your Gmail account, then select “Settings” from the drop-down menu.
3. Click on the “General” tab.
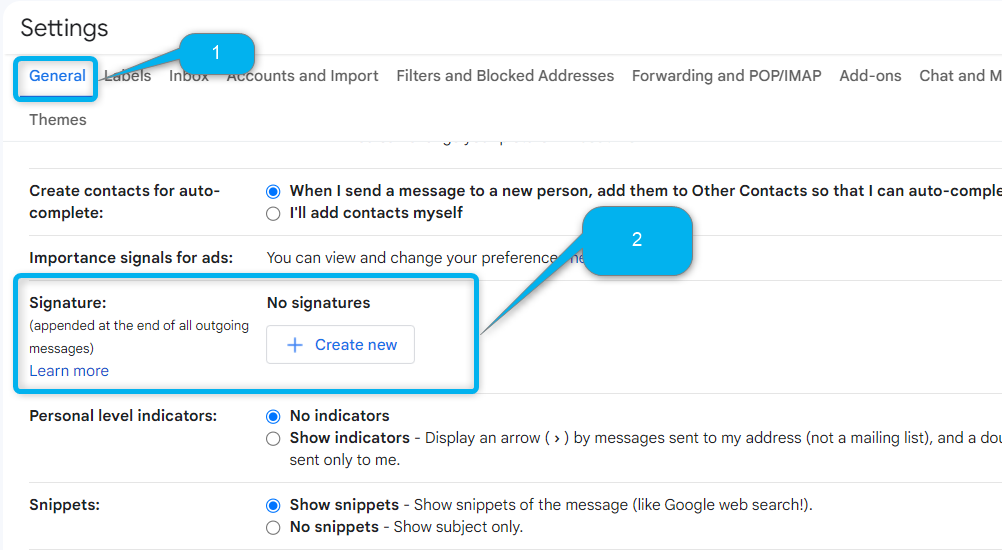
Click the “General” tab in the settings menu to access your general Gmail settings.
4. Scroll down to the “Signature” section.
In the “General” settings, scroll down until you see the “Signature” section.
5. Create your signature
In the “Signature” section, you can customize your signature to include your name, job title, contact information, and more. You can also format your signature with bold, italic, and underlined text or add images or links to make it more informative.
6. Save your changes
Once you’ve created your signature, click the “Save Changes” button at the bottom of the page to save your changes.
And that’s it – you’ve successfully added a signature to your Gmail account! From now on, your signature will automatically appear at the end of every email you compose, helping you to make a great impression and communicate more effectively with your contacts.
How to change your password?
If you want to change your Gmail account password, you’ve come to the right place. Let’s go through every step to make it as easy as possible for you :
1. Go to your settings: In the top right corner of your Gmail account, click the gear icon, then select “Settings” from the drop-down menu.
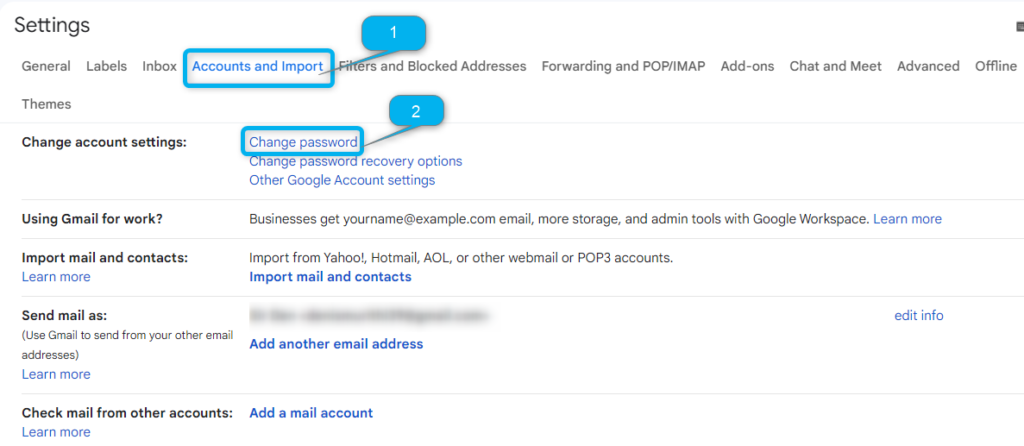
2. Click on the “Accounts and Import” tab: In the settings menu, click the “Accounts and Import” tab to access your Gmail account settings.
3. Click on “Change password”: Under the “Change account settings” section, you’ll see an option to “Change password.” Click on this option to start updating your password.
4. Verify your identity: To ensure that only you can change your password, Gmail will ask you to verify your identity. This might involve answering security questions, providing a phone number or email address associated with your account, or entering a verification code sent to your phone or email.
5. Create a new password: Once you’ve verified your identity, you’ll be prompted to create a new password. Be sure to choose a strong and secure password that’s easy for you to remember but hard for others to guess.
6. Save your changes: After creating your new password, click the “Save Changes” button at the bottom of the page to confirm your new password.
And that’s it – you’ve now successfully changed the password for your Gmail account! Remember your new password and keep it secure, and consider enabling two-factor authentication for an extra layer of security. Regularly updating your password and taking other security measures can help keep your Gmail account safe and secure.
How to delete your Gmail Account?
If you want to delete your Gmail account, it’s important to note that this is a permanent action that cannot be undone. Before proceeding, download any important data or files you want to keep, as you won’t be able to access them after your account is deleted. Here’s how to delete your Gmail account:
1. Log in to your Gmail account: First, log in to the account you want to delete.
2. Go to your Google Account settings: In the top right corner of your Gmail account, click on your profile picture, then select “Google Account” from the drop-down menu.
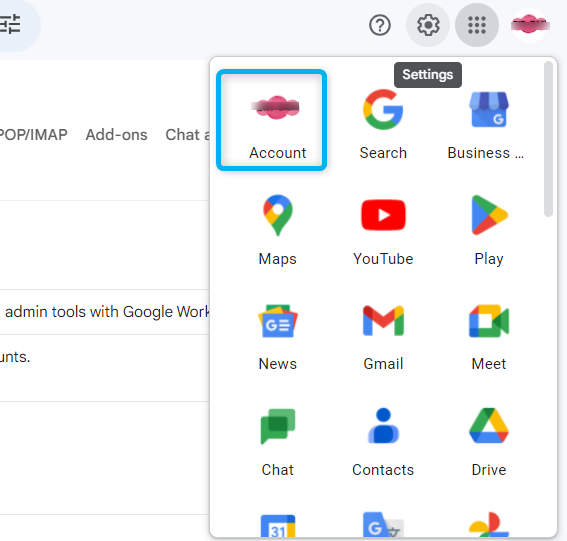
3. Click on the “Data & personalization” tab: In your Google Account settings, click the “Data & personalization” tab to access your account settings.
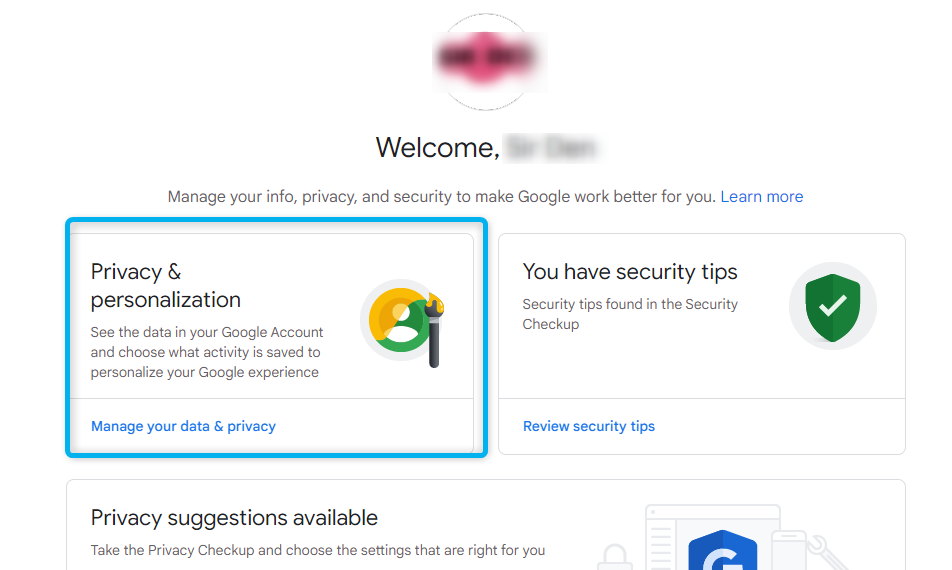
4. Scroll down to the “Download, delete, or make a plan for your data” section: Under the “Data & personalization” tab, scroll down until you see the “Download, delete, or make a plan for your data” section.

6. Click on “Delete a service or your account”: In the “Download, delete, or make a plan for your data” section, click on “Delete a service or your account” to start the account deletion process.
7. Select “Delete a Google service”: On the “Delete your Google Account” page, select “Delete a Google service” to delete just your Gmail account rather than your entire Google Account.
Follow the prompts to complete the deletion process: Follow the remaining prompts to confirm that you want to delete your Gmail account and provide any necessary information or verification codes. Once you’ve completed the deletion process, your Gmail account will be permanently deleted, and you won’t be able to access any data or files associated with the account.
And that’s it – you’ve now successfully deleted your Gmail account! Again, download any important data or files you want to keep before proceeding, as you won’t be able to access them after your account is deleted.


